The fortifications of the last Carlist War (1872-1876)
The forts erected by Liberal troops during the last civil war of the nineteenth century were stronger than those of the First Carlist War. Stonework was more widely used and some of these erections might be considered to be permanent or semi-permanent fortifications although they were nonetheless far from offering the advantages of the mighty French forts of the time.
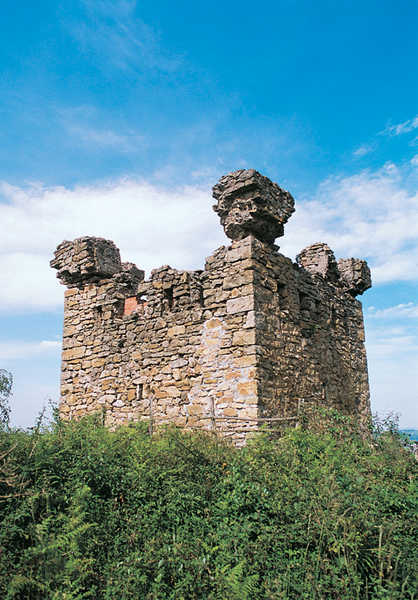
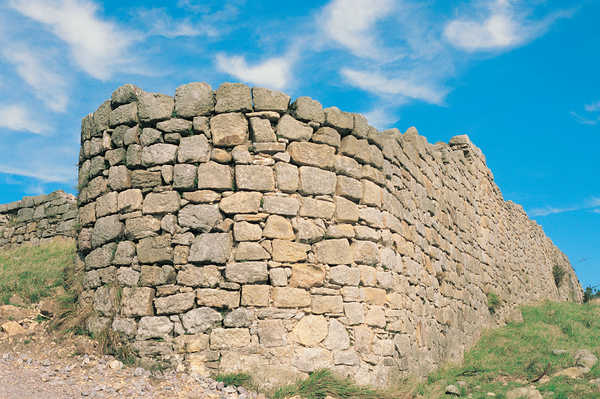
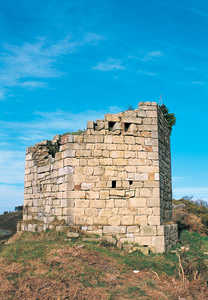
94. Elatzeta Tower (Irun).© Gorka Agirre
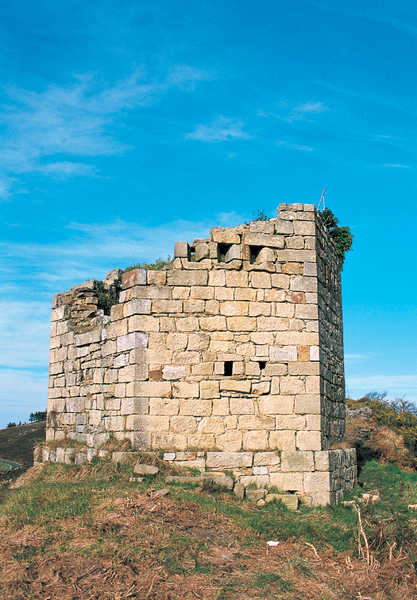
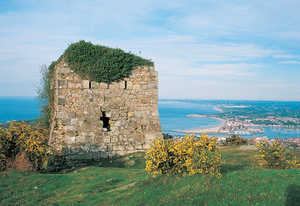
95. Jaizkibel Tower III.© Gorka Agirre
Some were relatively large and contained a significant number of embrasures for close-range defence as well as plentiful supplies of gunpowder. They were defended by a fosse, sometimes flanked by double caponiers (batteries located in the fosse which did not protrude from it) and a drawbridge. They had barracks, ammunition dumps, a cistern, latrines, etc. There were forty-six such constructions in the North East of Gipuzkoa, facing a similar number of Carlist forts (which were generally less sophisticated).
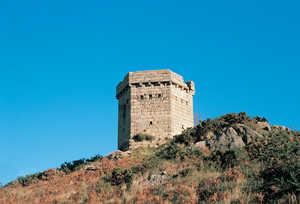
96. Erramuzko torrea (Jaizkibel Tower V).© Gorka Agirre

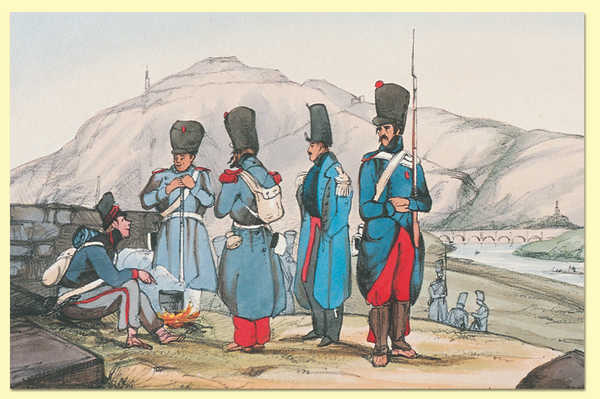
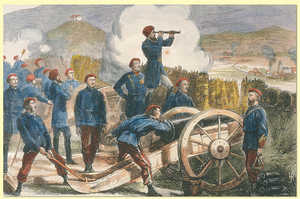
97. Carlist Wars. Soldiers resting.© Gorka Agirre
Some of the liberal fortifications were built at the initiative of the municipal authorities; on others cases, advice was given by the Engineering Corps (in which case the municipal authorities were entitled to recover any investments they had made in them). Others were executed directly by the Engineering Corps, although they sought contributions from the municipality in terms of materials and labour.
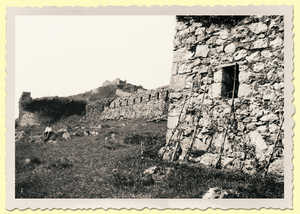
98. St. Barbara Fort (Hernani) around 1930.© Indalecio Ojanguren
During the war, the municipal authorities spent 984,307 pesetas on fortifications and, like many private individuals whose interests were affected by the fortifications, they often had to go to considerable lengths to claims the amounts they were owed by law.
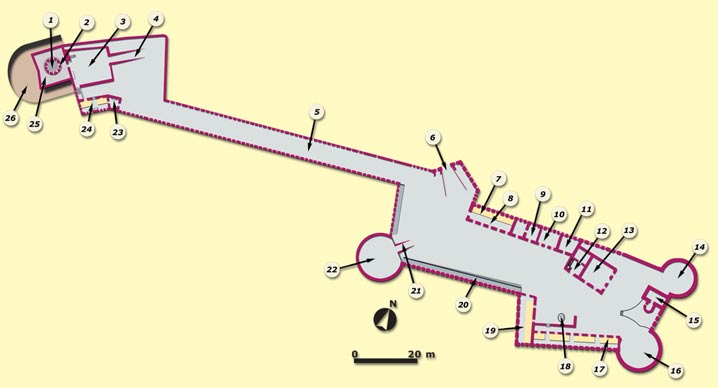
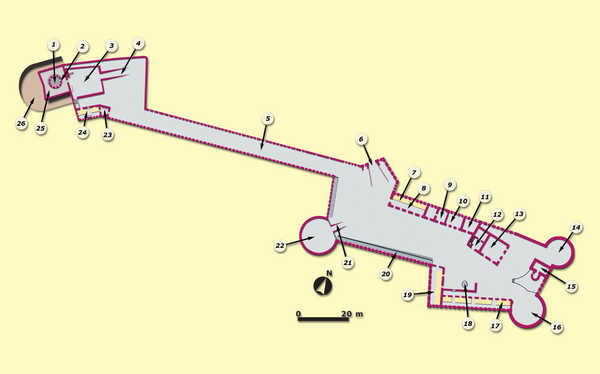
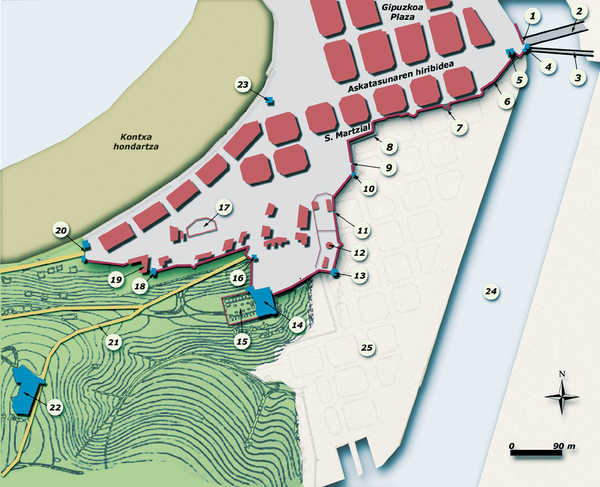
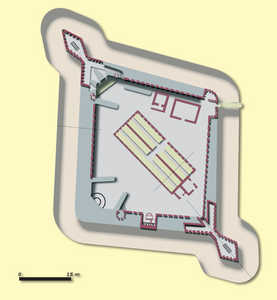
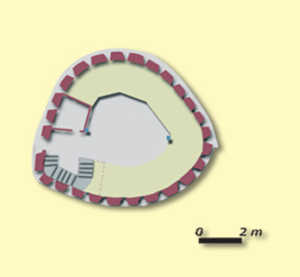
99. St. Barbara Fort in the Third Carlist War:
1-Round telegraph tower;
2-Entrance to the tower;
3-NW battery;
4-Ramp leading to the NW battery;
5-Steep double caponier linking the two sites in the fort;
6-Entrance to the fort;
7-Beds;
8-Barracks 1;
9-Dining area;
10-Kitchen;
11-Latrines;
12-Stairs leading to the officers' quarters;
13-Provisions store;
14-NE Battery;
15-Ammunition dump;
16-SE Battery;
17-Barracks 2;
18-Cistern;
19-Barracks 3;
20-Banquette;
21-Ramp leading to the SW battery;
22-SW Battery;
23-Corps de garde (sergeant);
24-Corps de garde (troops);
25-Upper crenellated platform;
26-Fosse.© Juan Antonio Sáez
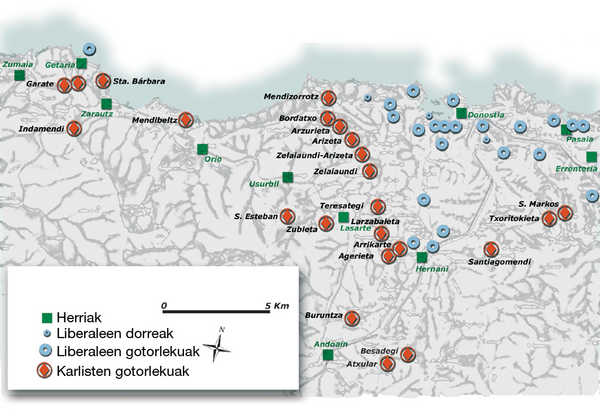
The troops defending the liberal San Sebastian during the Third Carlist War depended on three lines of provisional fortification hurriedly thrown up around the city (the walls had been demolished in 1864). The first, and closest to the Carlist lines, was mainly comprised of the Calvary tower and the Hernández, Artola, Farola, Lugaritz, Puyo, Ametzagaña, Miracruz and Admiral forts. The second line, further back, consisted of the Old tower, the Windmill and Pintore forts, the Loyola tower and the Concorrenea fort.
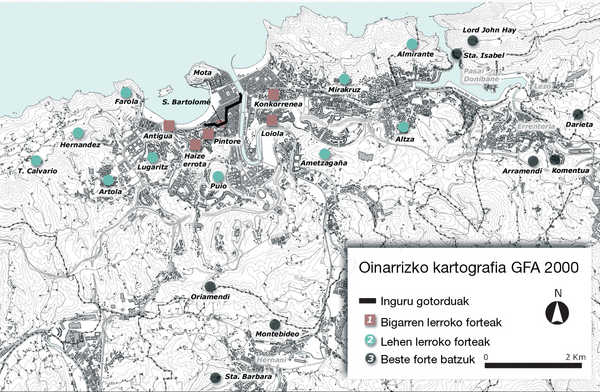
100. Liberal forts in the environs of San Sebastian (1876):
Crenellated belt;
1-Second line forts;
2-First line forts;
3-Other forts.© Juan Antonio Sáez
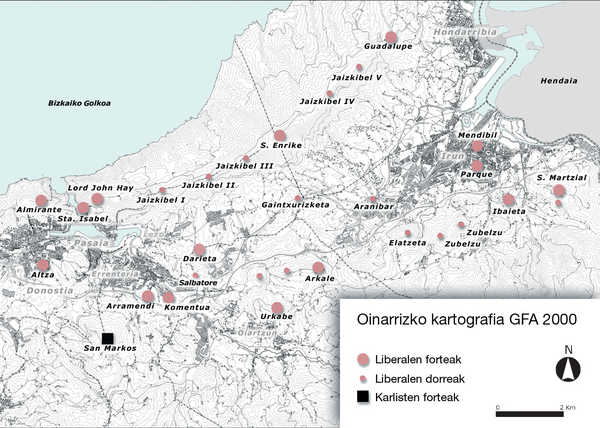
101. Liberal forts east of San Sebastian (1876):
Liberal forts, liberal towers;
Carlist forts.© Juan Antonio Sáez
The third fortified line ran around the urban nucleus of the city. It consisted of a crenellated wall of ordinary masonry backed by various adjoining bunkers and guardrooms and by the fortifications on Mount Urgull.
102. Jaizkibel I tower.© Juan Antonio Sáez
103. Campaign fortification in Irun. Note the internal covering of the parapet, made of fascines (tightly bound bundles of brushwood and small straight branches used as revetment material for terreplens and other fortifications).© Gorka Agirre
Significant fortifications were also constructed around the urban centres of other towns: Hernani, Irun, Tolosa, etc., featuring masonry walls and wooden gates blocking the streets. Garden walls and buildings in the town, reinforced with crenellated tambors or small artillery batteries, were also used as improvised defence walls.
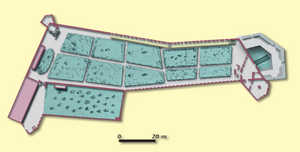
104. The wall of San Sebastian in the Third Carlist War:
1-St. Catherine's Gate;
2-New St. Catherine's Bridge;
3-Old wooden St. Catherine's Bridge;
4-St. Catherine's Battery;
5-St. Catherine's corps de garde for 40 men;
6-Crenellated wall;
7-Gate;
8-Crenellated wall with fosse in front;
9-Gate;
10-Wooden hut (St. Martin's) for 30 men;
11-Gate;
12-Gasometer;
13-Corps de garde of the gasometer for 35 men;
14-St. Bartholomew's Fort adjoining the new graveyard;
15-Graveyard;
16-Corps de garde for 20 men and gate to the Hernani road;
17-Old graveyard;
18-Corps de garde;
19-Old poor house, used as a barracks for 60 men;
20-Corps de garde and gate onto Paseo de los Baños for 56 men;
21-Old Hernani road;
22-Pintore Fort;
23-Corps de garde of the Manoeuvres Field for 54 men;
24-River Urumea (projected course);
25-Drying marshland and enlargement project.© Juan Antonio Sáez
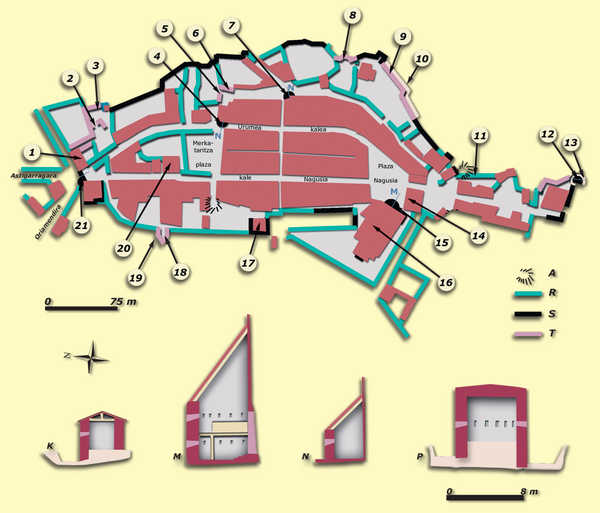
105. The fortification of Hernani during the Third Carlist War:
1-Lizarraga Fort;
2-Cannon emplacement;
3-Santiagomendi Battery and Antonenea;
4-Tambor (N);
5-Cannon emplacement;
6-Battery for Astigarraga;
7-Tambor (N);
8-Battery for Orkolagagaña and Izarzagaña;
9-Barrenechea Fort;
10-Fosse;
11-Covered way to the spring;
12-Paissac Fort (P);
13-Fosse of the Paissac tower;
14-Town hall;
15-Tambor at the entrance to the church (M);
16-Parish church;
17-Bireben Fort;
18-Santo Domingo Fort;
19-Fosse;
20-Military hospital;
21-Tambor and gallery (K);
A) Gate;
R) Uncrenellated walls;
S) Crenellated walls;
T) Earthen parapets.© Juan Antonio Sáez
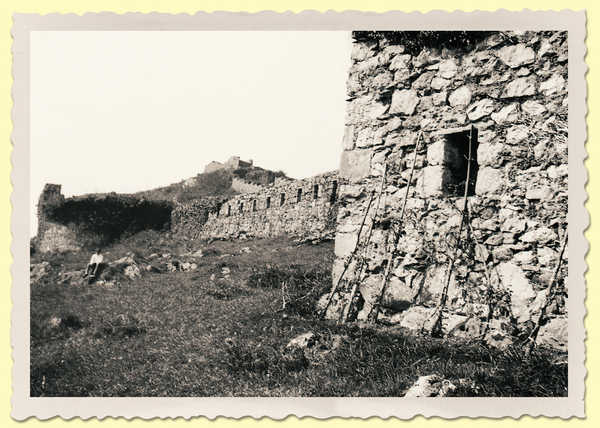
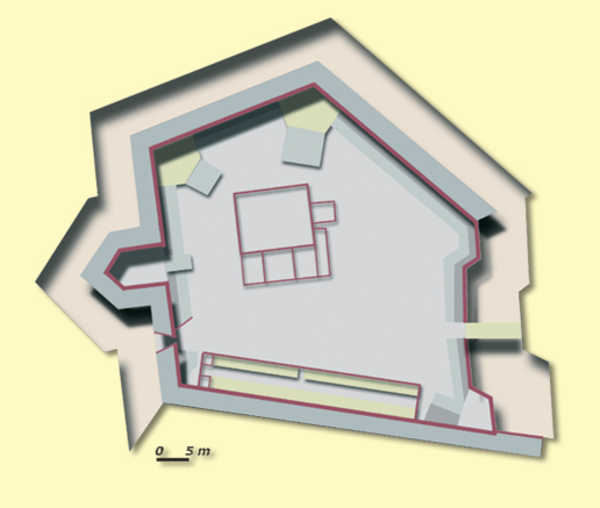
Unlike the fortifications built during the First Carlist War, important remains of some forts (the Ametzagaña, St. Barbara, Mendizorrotz, Oriamendi, Lord John Hay, Admiral forts, etc) and towers (Jaizkibel, Elatzeta, Zubelzu, etc.) are still standing. This is because after the war they were classified according to their military importance, and some remained active or on reserve for a number of years afterwards.

106. Carlist Forts (1876) facing the liberal fortifications.© Juan Antonio Sáez
107. Konkorrenea Fort.© Juan Antonio Sáez

108. Puio Fort.© Juan Antonio Sáez
109. Windmill Fort.© Juan Antonio Sáez
110. Lugaritz Fort.© Juan Antonio Sáez
111. Arramendi Fort (Errenteria).© Juan Antonio Sáez
112. Ametzagaña Fort.© Juan Antonio Sáez
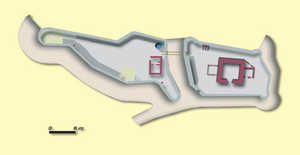
113. La Farola Fort, which incorporated the former Igueldo lighthouse.© Juan Antonio Sáez
114. Loiola Tower.© Juan Antonio Sáez
115. Pintore Fort.© Juan Antonio Sáez

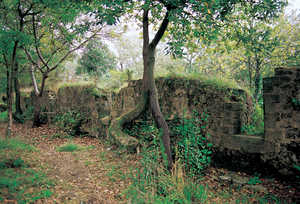
116. Admiral's Fort (Ulía). Remains of the barracks. The Fort of Lord John Hay stands on the other side of the Pasaia estuary from this square fort, on Mount Jaizkibel.© Juan Antonio Sáez
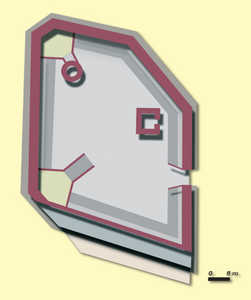
117. St. Henry's Fort. Situated on the crest of Mount Jaizkibel (576 m), the rectangular plan can still be seen. It was defended by four flanking batteries with a semi-elliptical plan - two double ones in the centre of each of the longer sides and two single ones at the ends of the longer southern side. The western battery is in the foreground.© Juan Antonio Sáez
118. Mendizorrotz Fort (Orio).Until February 1876 this fort was held by the Carlists. Opposite it stood the Calvario Tower (close to the rural nucleus of Igueldo) and the Hernández Fort, both Liberal. Two concentric, approximately rectangular, areas can still be made out. The photograph shows the upper of these areas.© Juan Antonio Sáez
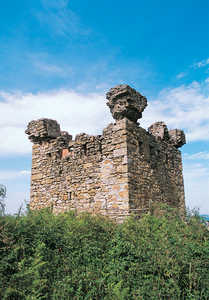
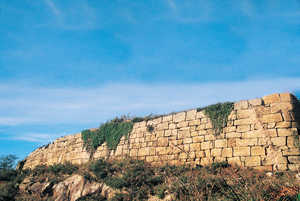
119. Lord John Hay's Fort (Jaizkibel). The plan is approximately rectangular, and the crenellated parapet that surrounded remains almost intact.© Gorka Agirre
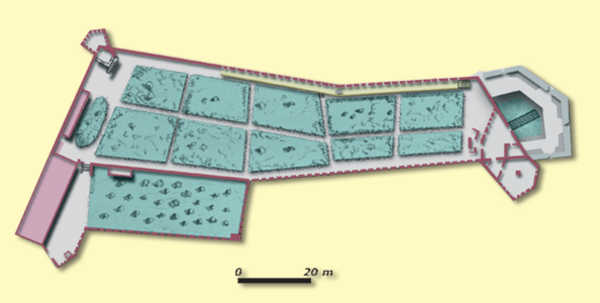
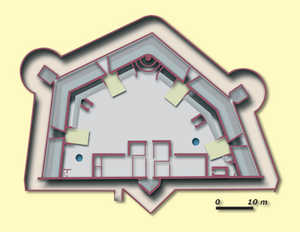
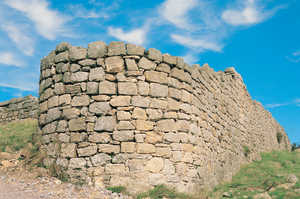
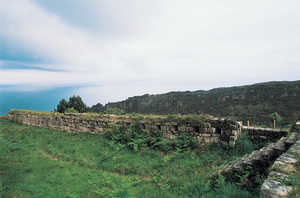
120. Ametzagaña Fort. It had an irregular pentagonal plan surrounded by a fosse flanked by two caponiers and two double caponiers. It is arranged on two levels. The upper level is occupied by the artillery battery, with six gun emplacements and banquettes between them (like the ones shown in the photograph). On the lower level were the barracks, the ammunition dump and other small buildings. The two sections were linked by a ramp and two staircases. © Juan Antonio Sáez
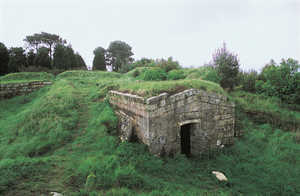
121. Lord John Hay's Fort. Ammunition dump, whose roof, ventilation ducts and window are still standing, isolated from the surrounding rock by a narrow corridor.© Gorka Agirre

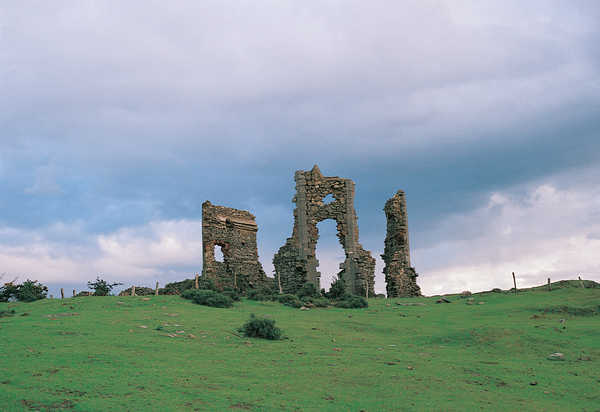
122. Ruins of the Pagogaña Fort (Irun). Octagonal central tower.© Juan Antonio Sáez

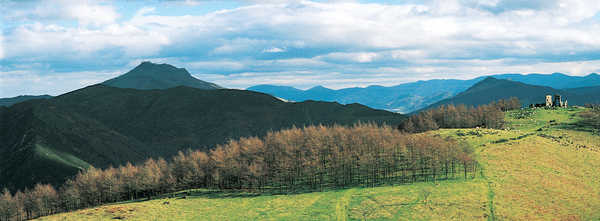
123. Panormic view from Mount Erlaitz over Pagogaña. The ruins of the fort of the same name can be seen on the right.© Juan Antonio Sáez